Description:
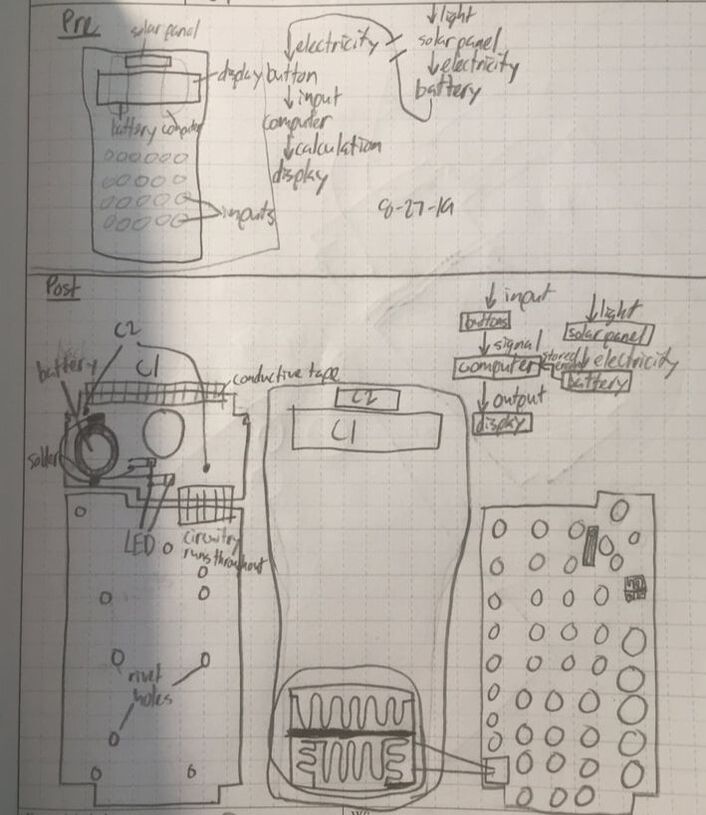
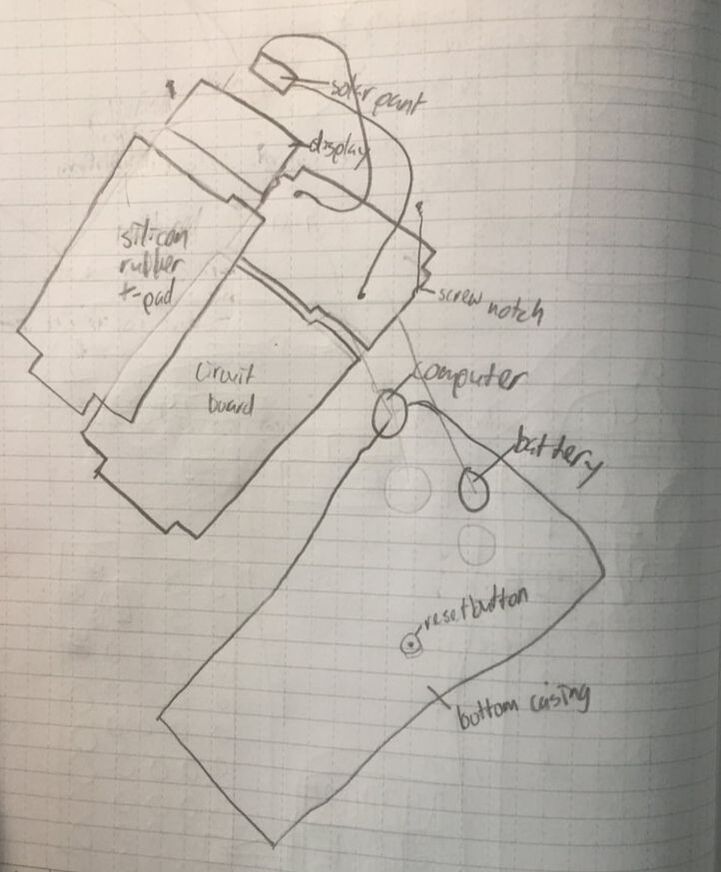
For this project, we began by bringing in a relatively simple and deconstructing it to gain an understanding of how it functioned as well as practice making sketches and flow charts. The item I brought in was a relatively simple scientific calculator. Below are pictures of my rough sketches of the internal pieces and exploded view of the calculator.
For this project, we began by bringing in a relatively simple and deconstructing it to gain an understanding of how it functioned as well as practice making sketches and flow charts. The item I brought in was a relatively simple scientific calculator. Below are pictures of my rough sketches of the internal pieces and exploded view of the calculator.
We then proceeded to select on item within our group to focus our research in the fields of function, materials, structure, and manufacturing in the terms of the object. We were also tasked with creating a theoretical redesign of the object to modify its purpose or make it more efficient. The object selected within our group was a crank flashlight with a rechargeable battery. Below are the report written about this abject and the accompanying presentation.
Concepts:
This unit was primarily focused on introducing the basics of engineering and did not develop any highly complicated principles. Below is a list of the major concepts we learned about while working on this project.
Conceptual Sketches: A conceptual sketch is a way of generally showing the structure of an objector how an object functions. This can be in the form of a general hand sketch of the item, either all together, in pieces, at an angle or some other variation, or a flow chart, representing the functions of the object. We used the different versions of conceptual sketches to represent and understand the functionality of our objects.
Reverse Engineering: Reverse engineering is a method of finding out how a object works in order to replicate it, understand it more thoroughly, or design another object that uses a similar system. There are 6 general steps to reverse engineering. The first is to identify the purpose. This refers to identifying a focus of research or reason for reverse engineering the object. The second step is to develop a hypothesis. This can be a general educated guess about why an item is designed in a way and if often represents the focus of research. The third step is disassembly, dissembling the object to record the parts and gather serial and part numbers. Step four involves analyzing the elements found in step three through four lenses of study: functional, structural, material, and manufacturing. In simpler terms, how they work, how the parts are connected to each other and the environment, what the materials are made of and why, and how they are made. Step five is to prepare a report to summarize the findings in an orderly manner. The sixth step involves redesigning the object in a manner that suits the purpose established in step one. These steps need not be completely linear as listed above; when further action is found to be needed, such as further research on parts, and can be rearranged as needed. We used the steps of reverse engineering to guide our process through analyzing the flashlight.
Gantt Charts: A gantt chart is a an adaptive chart used to plan and record research and other work through the duration of a project. We used a gantt to fulfill this purpose during our reverse engineering.
Reflection:
There were certainly moments that could have gone better in this project. My time management was one such weakness. During this project, there a few other projects running concurrently and these projects were allocated time as well. This led to the reverse engineering project being less prioritized in some situations where more time should have been spent on it. This was also true for the individual parts of the project. Too much time was spent researching raw data and not enough spent on interpreting the data. This to a relatively chaotic finish leading to the deadline. To solve both problems, the overall situation will need to be analyzed more carefully and unexpected delay anticipated.
Not all went poorly within the project though. Because a large amount of time was spent on research, the group was able to come to a greater understanding of the object as a whole and as individual pieces. We were also able to collaborate well with each other, helping one another when a certain aspect of the object or process was confusing or unclear.
